Upcycling Thrifted Sweaters // Simple Sewing Project
Happy New Year!!! It's refreshing to see that 1/1/21.
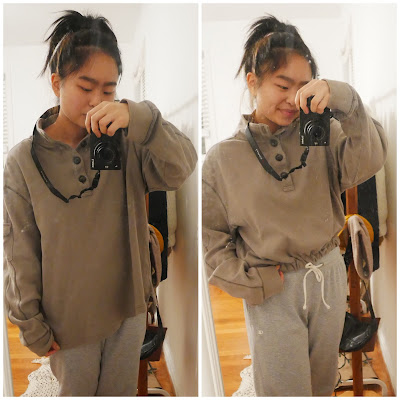
Today to kickstart the new year, I wanted to show you guys a simple upcycling method that I've been meaning to do for awhile. This sweater was actually thrifted about a year and a half ago :0 Yesterday I found it stuffed in a random closet because I've never really loved it. You know those sweaters that just make you feel lazy and a bit uncomfortable? This was that sweater - not because of the material, see dat banana republic tag, it's high quality - but because it was so longgg. It was probably some dad's go-to sweater. In many sewing projects, people often use elastic bands for the waist, sleeves, and more. I'm going to show you how adding a waistband transformed this subpar sweater that was no more than $5 into one of my favorite fits.
the M A T E R I A L S
Elastic Band (0.75 inch) of choice
Sweater of your choice
Sewing Machine + Thread
Safety pin/Clothespin
Sewing Pins
Measuring Tape (Optional)
the H E M
First, try on your sweater and mark approximately place where you would like the new "bottom" hem to be with a pin. Then, turn your sweater inside out! Using the measuring tape, I saw that I wanted to "get rid off " about 6.25 inches of the original hem. However, you don't really need to measure this if you don't care for accuracy. I folded over the bottom hem and pinned it the fabric down where I marked it. You can tell because those double lines near the top of the second photo indicate the original hem. Now that the original hem is folded over, the pins will be placed about 3+ inches from the hem (6/2=3). The space between the fold (which is cut off from the picture) and the line of pins will be where the elastic is inserted.
S E W I N G
In square one, you can visibly see the amount of space (about 1.25 inches) between the pins where I am sewing, and the fold to the right. Sew all around the shirt/sweater's bottom with a straight stitch, as you are essentially creating a new hem. Don't forget to leave an open space as shown in square two. This opening allows the elastic to be fed through it. It doesn't matter if it's cut that ugly because no one will see it! That's why our shirt is turned inside out. Later, we will go back and sew it shut. Time to prep your elastic. Make sure to cut enough so that it can wrap around your waist comfortably. In square three, I am using a clothespin (because I don't have a safety pin haha) to fish the elastic through! Square four shows the elastic going through the opening.
the E L A S T I C
This is the slightly fun, slightly tedious part. Continue to fish through the elastic, which actually takes more time than you think. It constantly scrunches up so make sure to always shift and tug the fabric. Keep going until it finally comes out the original opening. After the two ends finally meet, sew them together generously so that it does not break apart. Cut the excess elastic, and shove the waistband back into the opening. Sew the openings shut and for good measure you can sew all around the hem once again!
the F I N A L
YOOOOOO look at that! It seems simple but makes a huge difference. I know that it's hard to understand certain processes through words (for me sewing is really hard when I read blogpost tutorials) so I will try to make a Youtube tutorial soon! I still have a couple of other very beautiful sweaters that I got for good deals that I need to fix and hem. It'll be fun to showcase them:) This year, I want to buy less clothes and make the most of what I already have. What small but impactful lifestyle changes are you thinking of making? No matter what this year will bring, I know creativity will always find itself even in the weirdest and messiest moments. I hope you are inspired to create anything and take time to truly rest.
-thecreatingwarrior


yesss~~~pleeeez!!! I need those YouTube tutorial visuals ㅋㅋ
ReplyDelete